

Get Elastic APM ready in 5′ on Clever Cloud

APM means Application Performance Monitoring. When we say APM in the IT context, we refer to solutions that monitor the platform hosting the application and the app itself.
APM solutions extract information and data about processes, memory usage, disk reading or writing operations/seconds, and other information about the hosting platform. On the application side, they monitor in and out requests, errors, issues, and even code execution to highlight memory and time consuming processes.
These tools can be very important when you are on a cloud based service that auto scales, because some of these issues may be hidden by the auto allocation of more resources to an application. They also give the opportunity to check if the cloud provider's SLA is honored.
APM by Elastic
Available since version 6.2 (released in 2018), Elastic APM has proven its efficiency on monitoring and improving applications. Elastic APM monitors in real-time memory allocations, bandwidth usage, data rates, response time, database queries, CPU resources on the client side, calls to cache, unhandled errors and exceptions with their stack trace, aggregates logs in a pretty format and much more thanks to client and server side APM agents.
Distributed tracing feature allows you to see how a request flows into your micro-services architecture and to identify what exactly needs to be improved.
As all the collected data are stored and indexed in Elasticsearch, it's very easy to query them and point out bottlenecks.
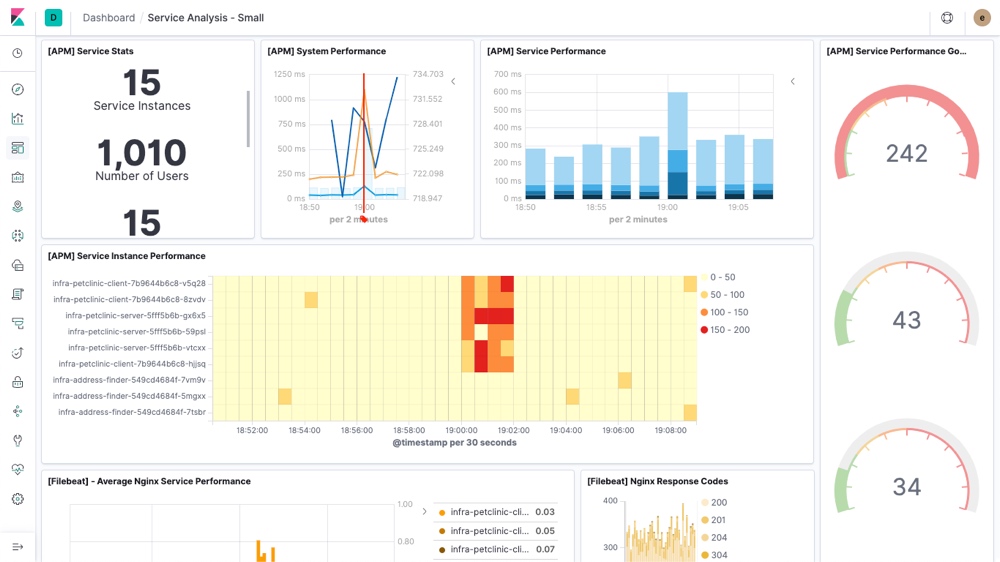
Additionally, data is automatically available to consultation in a Kibana dashboard. This dashboard comes with a special UI from Elastic where you can conveniently explore your data via generated charts, see metrics about CPU and system memory usage, get the best out of their default filtering by request type, request results, errors with the already identified culprit. And of course you can investigate by search, all of this working out of the box.
And as if it was not enough to really improve our "coding, debugging and releasing" workflows, Elastic APM can send email alerts or Slack notifications when issues arise.
From a practical point of view, APM needs an instance of Elasticsearch, an APM server, Kibana and an agent on the application side. On Clever Cloud, all you need to do is to configure your application to use the agent. Let's see how to do that.
Elastic APM on Clever Cloud
If you have read other blog posts of mine, you may know that I'm a Ruby on Rails lover, so no surprise if I chose this Framework to demonstrate how easy it is to get started with the Elastic APM on Clever Cloud. However, APM Agents are available in many languages, so you can follow this tutorial and replace the Ruby on Rails application by one of yours hosted on Clever Cloud that is written in one of the following languages: Go, Java, JavaScript (backend or frontend) or Python.
Creating the Rails application
Well, I'm not really a person that likes to do the same thing twice so as I already wrote an article on how to deploy Ruby on Rails applications on Clever Cloud, I will start this tutorial by considering you already have an application running like at the end of my previous article. If you don't, do not hesitate to take a break to follow the tutorial, it takes five minutes to be all set.
Creating the ES stack on Clever Cloud
Well, it's pretty easy:
- Go to your Clever Cloud console, under the organization where your application lives, select Create then an add-on. Scroll down until you find and select Elastic Stack.
- On the next screen select the plan you need, there is no minimal size to benefit from these features.
- On the next screen enable APM and Kibana
- You will now be prompted to name your add-on, and you will be able to select the deployment region. Fine tune as you need and press next.
- Go to the Service dependencies section of your application, then select the APM server in the Link applications drop down menu.
The Elastic Stack add-on will be automatically created: Elasticsearch, an APM server and a Kibana instance will start. You will see them appear shortly under your organization; there's nothing more you need to do to start using them.
If you navigate to your application's Environment variables menu, you will see that you can now use environment variables provided by the add-on we just created. And fortunately this is almost everything we need to finish this configuration.
⚠️ Warning: Make sure that you linked the APM server, and not the Elastic add-on. Otherwise, you won't have the correct ENV VAR for the next steps.
Configure your Application for APM
Ruby on Rails
Go in your terminal, under your application repository.
- with your favorite text editor, edit the
Gemfileto addgem 'elastic-apm'. - Create a file named
config/elastic_apm.ymlthat you will fill with this:
server_url: <%= ENV["ELASTIC_APM_SERVER_URLS"] %>
secret_token: <%= ENV["ELASTIC_APM_SECRET_TOKEN"] %>
You may here notice the usage of environment variables to protect APM server's secrets. You can use these environment variables thanks to linking your application to your APM server on Clever Cloud.
Other languages
You can find here the list of all the APM agents by language. You can just follow the simple steps and refer to the environment variables mentioned in the Ruby on Rails section to replace host url and secret token values. You may also need to use additional environment variables, read this to add them to your Clever Cloud application.
Deploying the APM agent
Okay, that was it. Now, you can add, commit and push these changes to Clever Cloud either via the CLI clever deploy or by pushing on the Clever Cloud git remote (usually named clever) of your application using git push clever master. Your application will restart within seconds and instantly connect to the APM server thanks to the environment variables we provided.
Enjoying your APM / Kibana
Now that our application is restarted, we can go to our Kibana application in Clever Cloud and click the link icon at the top right of the application menus. This will open a new tab with a Clever Cloud login form. Connect with your Clever Cloud credentials. This will open your Kibana after a brief apparition of a Keycloak page.
As Keycloak is not the topic here, all I'll say is that authentication to Kibana is delegated to Clever Cloud using this solution. If you want to know more about it, read this.
In Kibana, find the APM section in the menu on the left (tip: you can unroll the menu with a button at the bottom of the menu). Click it and Wow! you already can visualize your first application performance metrics in the beautiful Elastic UI for Kibana.
Here's a step by step video:
Going further
What we've done so far is pretty great as we can now monitor our applications performances in real time and we needed to setup almost nothing. This is way better than having nothing, but if you're familiar with APM tools you may want to customize and/or add more data to your reportings.
You can read the configuration section of each agent to get the best out of the configuration file we created. You will be able to extend the APM server side agent's configuration like adding your own tags and key filters, decide what exactly you want to capture for each request to your server, fine tune the way the data is sent to the APM server including size and time of the requests and much more. You can learn more about the data model of the events captured by APM here. You are going to learn here how to enrich your events with metadata to really customize your data. If your application is client side, you can enable the RUM (Real User Monitoring) by starting here.
Happy monitoring!


